Monday, July 30, 2007

Reducing Photo Size for web Use?

Last July 21 2007 from my post “Composition is Essential in Photography” I received a comment asking for a little help. How to reduce the size of photo to be uploaded into the web? And I decided not to answer it because, it is better for me to make a post on it so that it will be beneficial to all my visitor who will read this post with having the same problem.

Now here’s the comment

He said...

Hi! Can I ask you something? How can I reduce the size of my photographs? I wanted to upload one as my blog header, but it turns out to be very big! The same concern arose when I tried uploading pics at Friendster. It always says my files are too large. Help! Thanks.

The standard size of photo technically and as what I read it is maximum of 600 x 800 pixels, of 250 kb. In this size you can easily upload, view and download any picture from the web. There are many software available from the internet for you to download and use it. Like Photo Resize Magic, Adobe Photo Album, ACDSee, "SmartSaver" by www.ulead.com etc…


But I often use Adobe Photoshop to edit, resized, photo enhanced etc… But it is a little bit complicated if you are new in photography.

A simple way of doing this is to use the Microsoft Office Picture Manager which available if you are having it installed the MS Office 2003.

Assuming all the images are in one folder, the following works very well for quick image optimizations for web viewing.

  • Open the folder containing the images
  • Right Click on an image, click on 'Open With', select 'Microsoft Office Picture Manager'
  • In Picture Manage, select 'Thumbnail View'
  • Use Ctrl+A on the keyboard, or in the top toolbar go to >Edit >Select All
  • Click on Edit Pictures
  • In the edit task pane, select 'Compress Pictures'
  • In the compress task pane, select 'Web pages'
  • Click on OK


This compresses every image selected for web viewing. When you leave Picture Manager you will be prompted to save the images. Generally a 3mb image reduces to around 85 kb and is resized to 448 x 336 pixels.
It does not suit everything, but is good getting WIP images etc up in a hurry :)

Note: If the images need to be available in the original size for printing etc, copy them into a new folder for the web and compress the copies.
Tutorial on Picture Manager


Saturday, July 28, 2007

Thank You To All...!!!

I would like to dedicated this post to all, who supported me for the past weeks... To all those who vote my blog. Today because of all your votes I got this AWARD.... To Salaswildthought and to every body Thank you very much!!!


Filipino Blog of The Week Hall of Fame Award...

Thursday, July 26, 2007

Kung Pinoy si Noah...


Kung Pinoy si Noah....

...Ganito ang mangyayari sa barko. Read along...


Taong 2007 at isang ordinaryong middle class Pinoy si Noah. Nagpakita sa kanya ang Diyos at sinabing "Pagkatapos ng isang taon ay bubuhos ang

ulan at babahain ang buong kapuluan ng Pilipinas. Gusto kong gumawa ka ng isang malaking

arko at isakay mo rito ang pares-pares na mga hayop at mga mag-asawang pilipino sa iba't ibang kapuluan."

Ibinigay kay Noah ang "specs" ng arko at taos puso nitong tinanggap ang responsibilidad na sagipin ang sambayanang Pilipino sa napipintong pagbaha.

Lumipas ang taon, muling nagpakita ang Diyos kay Noah. Walang arkong nagawa si Noah
at galit na galit siyang tinanong ng Diyos,
"Nasaan ang arko na ipinagawa ko sa iyo? "Tumugon si Noah,"Patawarin po ninyo ako kung di po natupad ang utos ninyo! Nagkaroon po ng malaking problema sa plano po ninyo ."


At inilahad ni Noah ang mga sagabal na nakaharap niya sa pag-gawa ng arko.
Humingi siya ng Mayor's permit pero papayag lang daw si Mayor kung ang gagawa ng arko ay ang construction firm ng kanyang pamangkin. Tumungo siya sa Congressman
pero papayag lang daw si Congressman kung may matatanggap siyang

30% commission. Nagtayo ng unyon ang mga kinuha niyang manggagawa at nag-strike.


Natunugan ng mga left-leaning groups ang kanyang balak at ang mga ito ay nag-rally dahil daw sa hindi makatarungang pagpili ng mga taong sasakay sa arko (mga taong naniniwala lang sa Diyos ang pwedeng sumakay). Nakisali sa rally ang mga bakla at tomboy dahil bias daw na normal na mag-asawa lang ang pwedeng sumakay.

Ang civil society group ay nakisali na rin sa gulo dahil napag-alaman daw nila na ang pondong gagamitin sa paggawa ng arko ay galing sa donasyon ng
mga gambling lords at katas ng hueteng

Sa kaguluhang ito ay napilitang magpatawag ng hearing ang senado "in aid of legislation".

Sinubukan ni Noah na gamitin ang EO 464 para makaiwas sa hearing pero dahil hindi sya executive official, napilitan siyang tumistigo.

Nang malaman ng senado na utos ng Diyos ang pagpapagawa ng arko, dineklara nila itong unconstitutional dahil hindi raw nito iginalang ang separation ng church at state

.

Nakialam na rin ang NBI at PNP at sinabi nilang meron silang impormasyon na ang barko


raw na ito ay gagamitin ni Erap sa kanyang pagtakas. Sinabi naman ng ISAFP at DOJ na ito raw ay gagamitin ng grupong Magdalo sa binabalak nilang coup laban kay Arroyo. Nilapitan ni Noah si Mike Defensor para makipag-usap kay GMA. Payag daw si GMA na ituloy ang arko kung ipapaskil daw sa arko ang malaking mukha ni Arroyo
na may slogan "Towards a Strong Republic". "Hindi po ako pumayag kaya hanggang ngayon po ay may TRO ang pag-gawa ng arko.

Sa palagay ko po kailangan ko pa ng 10 taon para matapos ang inyong proyekto". Ang huling wika ni Noah. Napa-iling ang Diyos at sinabing, "Di ko na kailangang wasakin pa ang bansang ito. Hayaan ko na lang kayong sumira nito."

Wednesday, July 25, 2007

At Modesh Fun City

Last week ends my wife ask me if we can go to Modesh Fun City. A place where all the activities for DSS (Dubai Summer Surprise) (from 21 June to 31 August 2007) are being held.
What is DSS anyway?

Dubai Summer Surprises is the hot weather counterpart of the famous Dubai Shopping Festival. For ten weeks, there are special events in many of the malls with themes changing weekly. It has a family emphasis, focusing on both fun and education.

Modesh Fun City is a play and educational area for kids, open during the duration of the festival.


We come there because of Hello Kitty...

In short I took some of pictures during the show and here it is...


This shot was taken with higher ISO setting (1600) with Shutter Speed of 1/125 and Aperture of f/3.5... Photo enhanced and editing using Photoshop CS2.

Sunday, July 22, 2007

21 Rules of Life

A friend of mine send me a message stating a rule, "21 Rules of Life". So I decided to post it here... So Please read it may helps in our everyday life.


1. Marry the right person. This one decision will determine 90% of your happiness or misery.
2. Work at something you enjoy and that's worthy of your time and talent.
3. Give people more than they expect and do it cheerfully.
4. Become the most positive and enthusiastic person you know.
5. Be forgiving of yourself and others.
6. Be generous.
7. Have a grateful heart.
8. Persistence, persistence, persistence.
9. Discipline yourself to save money on even the most modest salary.
10. Treat everyone you meet like you want to be treated.
11. Commit yourself to constant improvement.
12. Commit yourself to quality.


13. Understand that happiness is not based on possessions, power or prestige, but on relationship with people you love and respect.
14. Be loyal.
15. Be honest.
16. Be a self-starter.
17. Be decisive even if it means you'll sometimes be wrong.
18. Stop blaming others. Take responsibility for every area of your life.
19. Be bold and courageous. When you look back on your life, you'll regret the things you didn't do more than the ones you did.
20. Take good care of those you love.
21. Don't do anything that wouldn't make your parents proud.

Saturday, July 21, 2007

Composition is Essential in Photography

Photography Composition' is something of a dirty word in some photographic circles, because of the way that certain rules used to be raised to the status of a religion, and a picture which did not follow the Rules of Photography Composition was automatically disregarded by the self-appointed pundits in the camera clubs and photo magazines. Even so, the old 'rules' (the Rule of Third) are excellent general guidelines, though you should never be afraid to break them if you can get a better picture that way.

Composition is all about how you arrange the elements of the scene in front of you. While you can't move the landscape, you will still have plenty of opportunities for perfecting your composition.


For a subject to be strong enough to be worth photographing, the relationship of its forms must be rigorously established. Photography composition starts when you situate your camera in space in relation to the object. For me, photography is the exploration in reality of the rhythm of surfaces, lines, or values; the eye carves out its subject, and the camera has only to do its work. That work is simply to print the eye’s decision on film. -Henri Cartier-Bresson


The best advice I can give is to use your feet. Get out there and walk around your chosen area to see how the elements within the landscape work together. Change your viewpoint - don't stick to the 'standard' eyeball-height view (everyone does this), so get down on the ground or get up to a height and use uncommon viewpoints to see if these perspectives can improve a scene. Take a look at the tips on landscape photography for more ideas. Photography composition is more art than science, although using scientific principles will get you better results, but you need to go beyond that. A book like Photography: The Art Of Composition will help increase your artistic proficiency while still keeping you grounded in the science.

Always take your time while composing a photograph. While changing light conditions can mean you need to work fast, I find that using a tripod slows things down and means that I have to think about what I'm photographing and the composition I'm trying to achieve rather than quickly snapping a scene in the hopes it'll turn out well when I look at it at home. Since I use a tripod, I'm more likely to go to a greater effort in getting a good photo to reward the time I've put into setting up the shot. If your exposures are going to be long, a tripod will ensure your photos are as sharp as possible.

Every Body Dance Now by Philippine Prison Inmates

Prison inmates in the Philippines practice their "Thriller" routine. This WILL be the best thing you see all day. Or month. (The Cebu Provincial Detention and Rehabilitation Center)


Thriller


Hail Holy Queen (from Sister Act Movie)


I Will Follow Him (from Sister Act Movie)


Thursday, July 19, 2007

Architectural Photography

Architectural photography is amazing. A single image can take hours to set up, then hours to shoot. The photographer is trying to match what they eye sees and what the architect envisioned when he/she designed the lighting.


Interior

Each set of lights gets its own exposure and must be balanced for color. On film that requires a lot of testing and calculations. Experience really comes into play. Imagine testing exposure via light meter and Polaroid for each set of lights, one at a time, knowing what the color temperature is of each, and what filtration and filter factor for each. Oh, and add in reciprocity issues, because exposures can last for seconds up to an hour. Then try to bracket all that onto several sheets of film. It’s not unusual for one image to take an entire night to make

Architecture has many attractions for the new photographer. Buildings don't usually move much, are generally fairly easy to find and will seldom complain when you try to take a picture - or at the results. However it's main attraction has to be an interest in the built environment. We all live in buldings, most of us work in them, see them every day.

Exterior

Despite this, buildings are difficult to photograph well, presenting a number of challenges that make life interesting for the photographer. It is often very hard to produce exciting images that make your work stand out from other people.
Technically it can also be a demanding area. Professional photographers of architecture usually work with medium or large-format cameras, producing work of high technical quality. With a 35mm camera you cannot hope to equal this, but you can certainly produce respectable images, and may well have the advantage of a wider choice of focal lengths giving more precise framing.
Outdoor
This feature will look at the subject for people with an interest in photographing buildings using ordinary photo equipment, whether film or digital. However it will at times mention the increased potential of professional equipment.

Tuesday, July 17, 2007

Floating Bridge in Dubai

Yesterday the Road and Traffic Authority (RTA) Dubai, finally open a new bridge in order to battle congested traffic caused by motorist who wants to eliminate passing thru the Salik (new road toll system in Dubai) as of my curiosity I decided to pass the said floating bridge and take some snap on it.


The bridge stretches across the surface intersection near Deira City Centre and Dubai Creek Golf and Yacht Club, and ends at the intersection to be built on Riyadh Street between the Dubai Courts and the Creek Park.

It provides an additional link between Khalid Bin Al Waleed Road and Oud Metha Road from one side and Al Ittihad Road and Deira from the other.

The floating bridge will be open from 6am to 10pm daily and is considered a temporary solution until the Roads and Transport Authority (RTA) completes the design and construction of a permanent bridge in the same place.

Sunday, July 15, 2007

Silhouette Photography

What is a Silhouette?
A silhouette is a classic and dramatic photographic technique. By isolating the outline of a subject while eliminating detail, a silhouette places tremendous emphasis on shape and contrast. It's not only popular for portrait photography, but also landscapes and nature photography. While traditional SLR cameras made the process of creating a silhouetted shot a matter of manual exposure adjustment, the automatic nature of digital cameras makes achieving this effect more difficult. However, it's not impossible to shoot silhouettes with your digital camera if you follow a few simple guidelines.

In photography, a silhouette is defined as an outline that appears dark against a light background. More specifically, it is where your subject is seen as a black shape without detail against a brighter background. This is an artistic outcome that many photographers like to perfect. This effect can be achieved with any kind of bright light source, but of course the most commonly used is the sun around sunrise or sunset. The backlighting from the sun shadows everything towards you and produces this effect.


Silhouette Techniques
When you are getting ready to take your silhouette pictures, there are a couple things to keep in mind. These tips work for both digital and film photography. Make sure you never point the lens directly at the sun. If there is too much light, the light will fall on your object. If there is not enough light, your background will become gray. The main key to silhouette lighting is having your background lighter than your object, but this can be done in more ways then one. Many photographers focus on a certain time of day, where their subject is, what kind of weather there is, and where the sun positioned in the frame. See above image...

Other Options

There are quite a few more options to tweak your camera to get a silhouette just right, but they depend of the capacity of your camera. Some cameras offer a specific picture mode that adjusts your camera to take a silhouette. Others offer manual control over your exposure system that can help get the right shot. When setting these manual controls, keep in mind that a good silhouette comes from a fast shutter speed, a slower aperture, negative exposure compensation, and a higher film speed. It's hard to recommend exact settings for the wide range of scenes you'll find yourself in when shooting silhouettes, but take advantage of every feature your camera has and find out which setting works best for you.

Silhouette Shooting Style
It's digital, so shoot away! Take as many shots as you have memory to give you the widest range of shots to choose from. Experiment with different exposure settings -- you can always check the EXIF data later to see what the settings were when you captured that perfect silhouette. Try changing your point of view or rearranging your subject to emphasize the most identifiable features. Remember that your LCD preview screen is your best friend in situations like these -- no more waiting until your film gets processed to see your results. This digital camera standard feature is the best way to make sure you got the correct shot while you're still at the scene. And, as always, it's a good idea to use a tripod to minimize camera vibrations and ensure that your subject's edges are distinct.


True to form

The use of silhouettes is a great technique for creating mood and emphasizing line. Hopefully, this article has shown you that shooting silhouettes doesn't have to be difficult. By playing a few tricks on your camera, you can create stunning silhouettes of your own.

But all of these, keep in mind the number one Rule in Photography, "the Rule of Third"...

What is The Rule of Third?


The Rule of Thirds is a guideline that photographers use to help them compose, center and frame their photographs. According to the rule of thirds, a frame can be divided into nine equal sections by dividing the space with two horizontal lines and two vertical lines. Framing the center, the lines will produce four corners points, known as “power points” .


A photographer should then orient the central focus of his picture at or in the middle of any of these four power points. The effect of the resulting picture will change depending on where the subject is placed. If the subject is located at one of the top corners, the image will take on a stronger, more imposing tone. Conversely, an image centering on either of the bottom two power points will appear more demure, mysterious and secretive.

The image can also be located in the direct center of all four power points. If this is the case, the final picture will appear more balanced and direct.

By applying and manipulating the rule of thirds, a photographer can make his photos more artistic, adding a remarkable degree of dynamism and dimension.


Dubai World focuses on Philippines

DP World one of Dubai Biggest Company operating outside the United Arab Emirates enter in the 7,100 islands of the Philippines. As what I read in the Gulf News (UAE local newspaper) said...
Dubai: Dubai World, the holding company for Nakheel, DP World and several other Dubai entities, is looking for potential projects in the Philippines.
Dubai World chairman Sultan Ahmad Bin Sulayem held talks with Philippines President Gloria Macapagal Arroyo on Friday to explore investment opportunities.
The talks covered Dubai World's interest in exploring investment in the Philippines in areas of ports, free trade zones, property development and the hospitality sector, according to a company statement.
The visit was arranged by the governor of Cebu Province, Gwendolyn Garcia, following her visit to Dubai in June, when she met senior Dubai World executives.

In the Picture Bin Sulayem and his delegation with Arroyo. The talks covered Dubai World's interest in exploring investment in several sectors. (Press Release)


Read More....

Saturday, July 14, 2007

New Seven Wonders of the World

The New7Wonders organization is happy to announce the following 7 candidates have been elected to represent global heritage throughout history. The listing is in random order, as announced at the Declaration Ceremony on 07.07.07. All the New 7 Wonders are equal and are presented as a group without any ranking.


Great Wall of China


Petra- of Jordan


Christ Redeemer of Brazil


Machu Picchu of Peru


Taj Mahal of India


Chichén Itzá of Mexico


Roman Colosseum of Italy

The Finalists for the New7Wonders


EYE Test

Can u find the B(there are 2B's)? DON"T skip or ur wish wont come true...


RRRRRRRRRRRRRRRRRRRRRRRRRRRRRRRR
RRRRRRRRRRRBRRRRRRRRRRRRRRRRRRRR
RRRRRRRRRRRRRRRRRRRRRRRRRRRRRRRR
RRRRRRRRRRBRRRRRRRRRRRRRRRRRRRRR
RRRRRRRRRRRRRRRRRRRRRRRRRRRRRRRR

Once youve found the b


Find the 1

IIIIIIIIIIIIIIIIIIIIIIIIIIIIIIIIIIIIIIIIIIIIIIIIIII
IIIIIIIIIIIIIIIIIIIIIIIIIIIIIIIIIIIIIIIIIIIIII1III
IIIIIIIIIIIIIIIIIIIIIIIIIIIIIIIIIIIIIIIIIIIIIIIIIII

Once you found the 1..............


Find the 6


9999999999999999999999999999999999
9999999999999999999999999999999999
9999999999999999999999999999999999
9999999999999999999999999999999999
9999999999999999999999999999999999
9999999999999999999999999999999999
9999699999999999999999999999999999
9999999999999999999999999999999999
9999999999999999999999999999999999
9999999999999999999999999999999999
9999999999999999999999999999999999
9999999999999999999999999999999999


once youve found the 6...

Find the N (it's hard!!)

MMMMMMMMMMMMM
MMMMMMMMMMMMM
MMMMMMMMMMMMM
MMMMMMMNMMMMM
MMMMMMMMMMMMM
MMMMMMMMMMMMM
MMMMMMMMMMMMM
MMMMMMMMMMMMM
MMMMMMMMMMMMM
MMMMMMMMMMMMM

once you've found the N...


Find the Q...
OOOOOOOOOOOOOOOOOOOOOOOOOOO
OOOOOOOOOOQOOOOOOOOOOOOOOOO
OOOOOOOOOOOOOOOOOOOOOOOOOOO

Thursday, July 12, 2007

Burj Dubai - The Tallest Building in the World


The Burj Dubai (Arabic: برج دبي for "Dubai Tower") is a supertall skyscraper currently under construction in the "New Downtown" of Dubai,United Arab Emirates. Projected to be completed and occupied in 2009, the building is part of a huge development located at the "First Interchange" (aka "Defense round-about") along Sheikh Zayed Road at Doha Street. On completion, it will likely be the tallest structure in the world of any kind by a wide margin.


The Burj Dubai under construction


Facts:

A subtle reference to the onion domes of Islamic architecture can be found in the building's silhouette when looking up at the lobes from near the base.
The tower will be situated on a man-made lake which is designed to wrap around the tower and to provide dramatic views of it.
Engineers working on the design considered installing triple-decker elevators, which would have been the first in the world. The realized building will use double-decker elevators.
The top of the building will contain a public observation deck and a private club above that.
Although the building's shape resembles the bundled tube concept of the Sears Tower, it is structurally very different and is technically not a tube structure.
The design by Skidmore Owings & Merrill replaces a plan to reuse the design for Grollo Tower, which was proposed in Melbourne a few years earlier.
Designed by Adrian D. Smith, FAIA, RIBA Design Partner at Skidmore Owings & Merrill LLP.
"Burj" is Arabic for "Tower".
Burj Dubai will become the world's tallest building, along with the world's tallest man-made structure when it is completed.
The highest residential floor will be level 109.
An observation deck will occupy the 124th floor.
The building was rotated 120 degrees to allow for less stress from the prevailing winds.
The building sits on a concrete and steel podium with 192 piles descending to a depth of more than 50 metres (164 feet).
A total of 45,000 cubic metres of concrete are used in the foundations with a weight in excess of 110,000 tonnes.
The exterior cladding is of reflective glazing with aluminium and textured stainless steel spandrel panels with vertical tubular fins of stainless steel.
The cladding system is designed to withstand Dubai's extreme summer temperatures.
This is the first world's tallest building since prehistoric times to include residential space.
The official height has not been released, and remains secret. The total height of 808 meters is subject to change.


Wednesday, July 11, 2007

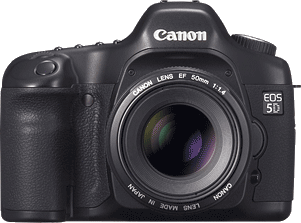
Top 5 Digital SLR Camera for Professionals

As the Digital technology in Photography is concern a lot of digital camera's are available in the market today, from compact digital camera up to Digital SLR... As what I posted last 5th July with regards to Camera Needs , this is to show some of Digital SLR Camera Pros most wanted!

While pros were slow to convert to digital, now many are going the way of the megapixel and getting professional digital SLR cameras. The selection of professional caliber digital SLR cameras is quite impressive. Here is a list of the best digital SLR cameras for professionals as of today.
The 16.7-megapixel 1Ds Mark II delivers performance and high quality imaging pros will die for. This is the ultimate wish-list digital SLR for a pro shooter. The features include:
Shooting in JPEG and RAW formats
Ten white balance settings, such as daylight, cloudy, fluorescent, light and custom.
Continuous shooting speed range between four shots per second and 32 shots per second
Voice narration attached to the image Dimensions of 6.1" wide x 6.2" high x 3.1" deep, weighing 2.68 pounds (just the body).

The 12.4 megapixel darling of the digital pro camera lineup boasts superb image quality. Its diverse features include:
Shooting JPEG and RAW simultaneously
Continuous shooting mode of 5 frames per second up to 15 consecutive shots
GPS records location with shooting data with optional accessories (how cool is that?)
Support for transfer direct via wireless LAN
2.5-inch color LCD
Dimensions of 6.2" wide x 5.9" high x 3.4" deep, weighing 2.4 pounds (body alone).


This 10.2 megapixel digital SLR straddles the line between professional and consumer level, but for beginner pros or pros on a budget this is a fine choice. The features include:
Shooting five frames per second continuously.
Eleven area autofocus
Wireless transmission
Dimensions of 3" x 3.8", weighing 19.8 ounces (body).


5. Canon EOS 1D - Mark lll New in the Line-up of DSLR.


So now its up to you and your budget which camera will fit your needs?


Sunday, July 08, 2007

Digital Phtography Tips - Background Last Part

To avoid an unpleasing background, find a different angle for your shot. Get down low to use the sky as a background (example lower left). Some of my favorite shots were taken while I was laying flat on the ground or floor. Getting above your subject allows the lawn or even your floor (example lower right) to function as your background. At your own risk of course, get up on a counter, step ladder, chair o r other stable object to get the angle you want.

Keep in mind that the background needs to have a complementing and pleasing color scheme. Clashing colors are clashing colors - avoid clashing colors. Find a different location. Your subject may need to select different clothing. This rule applies regardless of the background being in or out of focus. As what the example below.


Unless you are looking for a special effect, you need to be aware of the relative brightness of the background. See picture below.


There are exceptions to this rule, but having background objects that are brighter than the subject will often be distracting. Your eye will typically be attracted to the brightest part of the picture.

If you can't find the right existing background, add your own. Many backdrops/backgrounds are commercially available. A simple and inexpensive backdrop is a very large sheet of white muslin fabric. This makes a very pleasing background for portraits. For a lower budget approach, employ a white or black sheet. Be creative! Post processing techniques for removing, modifying or replacing the background abound. One amazing tool for accomplishing this task is Adobe Photoshop.

Before Photoshop After Photoshop

One such Photoshop technique is selective coloring. If you have a photo with a cluttered or distracting background, it may be a candidate for selective coloring. Selective coloring starts with the creation of a duplicate image layer in Photoshop. The second layer is converted to black and white or any color (see example above) and turned into a layer mask. The layer mask is carefully painted to allow or disallow the color layer to show through. The result is a full background and a subject in full color.


Saturday, July 07, 2007

I WON the 63rd Week of the Filipino Blog of the Week !!!

At last after long battle on the blog sphere I won the 63rd Week of the Filipino Blog of the Week Poll hosted by our dear friend Talksmart The Composed Gentleman...

And here's my Award
63rd Week

To all bloggers who voted me. Thank you very much for all your time... And to OFWlayf thank you once again...


Friday, July 06, 2007

Digital Photography Tips - Background Part 2

Last July 3, 2007 I post regarding Background and leave a word to make experiment on it... Do you try it or not if not !!!
Here's another way to get a more diffusely blurred background is to use a lens with a long focal length such as the 70-200mm f/2.8 Lens used for the above Monster Buck picture. It will be much more difficult to blur a background with the 16-35mm f/2.8 Lens of Canon, 17 - 55mm f2.8 of Nikon or 17 - 35mm f2.8-4 lens of Sigma. All focal lengths yield the same depth of field when used at the same aperture setting and subject framing. But, the image compression a telephoto focal length provides magnifies the already blurred background. The result is a background that appears more diffusely blurred.


Shutter Speed 125/1 sec, f/2.8 using 70 - 200mm f/2.8 lens

Using a higher focal length has the additional advantage of including less background in your picture. A higher focal length lens has a smaller angle of view. Pretty simple - less background in your picture leaves less room for distraction. This may be a reason to choose the 180mm f/2.8 Macro Lens over the 100mm/105mm f2.8 Macro Lens. Again, less background in the picture reduces the chance of distractions.


Thursday, July 05, 2007

Understanding your Camera Needs... What is the best Camera to Use?

Different cameras do have their strengths and weaknesses, and these will restrict your possibilities. But the most important restriction - and strength - is always your imagination.
Digital cameras are great for photographing people, not least because you will need to edit your results severely. Better to waste a few electrons than film.
SLR / DSLR Cameras

This is the camera type most widely used by professional photographers because of its flexibility.

Advantages

Accurate viewing and framing. You see from exactly the same viewpoint as the picture is taken - no 'parallax error' Most SLR / DSLR cameras show slightly less than appears on film
Interchangeable lenses give more flexibility and different perspectives
Generally have wide range of shutter speeds and apertures
Modern cameras are highly automated, giving good exposures without much thought.
Auto focus cameras are especially useful with longer focal length lenses.
Dedicated flash units can give accurate flash exposures automatically.
Disadvantages

Generally quite large, so you have more to carry around
Camera size makes them and you quite conspicuous
Shutter and mirror noise can be obtrusive
Time between pressing shutter release and taking picture can be around 30-50ms (longer if camera auto-focuses during this time.).
Viewfinder blacks out briefly while picture is taken
Rangefinder cameras

Used by professionals before the SLR became common in the 1970s, and still preferred by some for covering rapid action. The Leica M series are expensive, but more affordable Konica and Voigtlander models have led to renewed interest.

Advantages

Smaller, quieter and generally less conspicuous than SLR cameras.
Clear viewfinder image with bright line frame enabling areas around subject to be seen, which remains visible during exposure.
Very short lag (usually less than 30ms) between pressing release and exposure.
Disadvantages

Viewfinder is above and to the left of taking lens - has a slightly different view to what appears on film. (parallax error)
Not suitable for long telephoto lens (90mm is about the practical limit)
Generally limited automation - some have auto exposure.
Framing less accurate (still good on most models.)
Compact cameras

Commonly used by amateur photographers, although many professionals carry one in a pocket for when they don't have their full outfit with them.

Advantages

Unobtrusive and in common use; usually quiet.
Zoom lenses generally cover the most useful range for photographing people.
Relatively cheap.
Usually highly automated - exposure, focus, film wind etc
Disadvantages

Extended lag between pressing release and taking picture (often > 500ms)
Built in flash mainly useful in bright light for fill in, gives poor results in low light.
Other types

Many photographers in the middle of the twentieth century preferred the twin lens reflex camera, usually taking 120 film, and used from waist level. Rather than making eye contact with the subject through the pointing lens and viewfinder of the camera, they bowed down in front of it, peering into a box held firmly against their gut.

These cameras, particularly the Rolleiflex and Rolleicord, were quiet and unobtrusive to use, and their large negative allowed for considerable cropping. A few photographers still like to work this way.

Wednesday, July 04, 2007

Transformers the Movie

Who could ever forget the transformers (Cartoon) during our childhood... I'll never forget them... the Autobots and Decepticons!!!, Watch this trailer to understand why lots of people are very interested to see the movie TRANSFORMERS.. (including myself)..


So what are you waiting for, today 4th of July ....!!!!

Tuesday, July 03, 2007

Digital Photography Tips - The Background Part 1

When taking pictures, we concentrate intently on our subjects - but what about the background? Upon later inspection of our photos, we often find the background detracting from an otherwise great shot.

Taking control of the background can help turn a snapshot into a beautiful photo.

The first step to improving the backgrounds in our photos is to be conscious of the background's importance to our photos. We must know that the right backgrounds can make our shots stand out. This often means simply paying attention to what is behind out subjects during our photography sessions.

Unfortunately, the complete solution is not nearly as simple. The normal goal is to keep the subject as the center of interest in a picture (not to be confused with the center of a picture). Your eye should be drawn to the subject in the final image, and the background must not be distracting from the subject. Shots must be setup to take advantage of a clean or pleasing background.


First suggestion is to utilize your lens to throw the background out of focus. The depth of field (amount of in-focus distance) in your picture needs to be reduced enough so that the subject is sharp and the background is blurred. Notice how the Sun Flower stands out against its background in the above picture. There are no distractions. A combination of factors allows your lens to accomplish this task.

How to get this , first, open the aperture wide. All other factors being identical, a wider the aperture yields a shorter depth of field. How wide? Experience is the best teacher here. The above picture was taken at f/5.6. Try make an Experiment!


PayPal Its Free Sign-up Now!!!

Sign up for PayPal and start accepting credit card payments instantly.