Many of you have probably stared at a silhouette photo and wondered to yourself how exactly they were taken. And to help some of our friends in blogsphere having the same hobby of photography but just starting I hope this post will help them.
What is Silhouette?
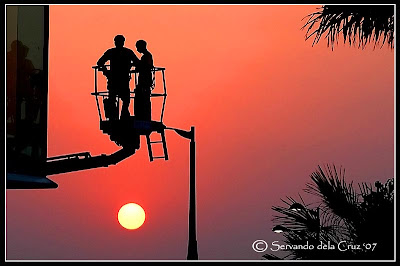
In photography according to dictionary, "a silhouette is defined as an outline that appears dark against a light background." More specifically, it is where your subject is seen as a black shape without detail against a brighter background. This is an artistic outcome that many photographers like to perfect. This effect can be achieved with any kind of bright light source, but of course the most commonly used is the sun around sunrise or sunset. The backlighting from the sun shadows everything towards you and produces this effect.
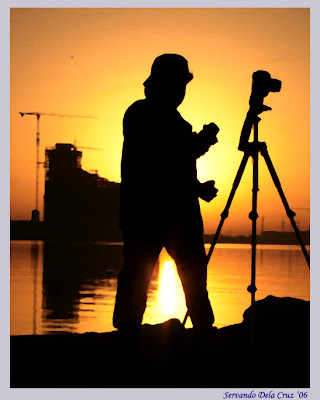
Silhouettes could contain a couple’s moment on the beach, a person staring out at a landscape, or an amazing cityscape with the sun going down in the background. Silhouette photographers must have great timing and perfect exposure settings.
How to take a Silhouette?
When you are getting ready to take your silhouette pictures, there are a couple things to keep in mind. These tips work for both digital and film photography. Make sure you never point the lens directly at the sun. If there is too much light, the light will fall on your object. If there is not enough light, your background will become gray. The main key to silhouette lighting is having your background lighter than your object, but this can be done in more ways then one. Many photographers focus on a certain time of day, where their subject is, what kind of weather there is, and where the sun positioned in the frame.
The best time to get a silhouette is when the sun goes up and goes down from which the sun rays are not to shine to look with naked eye.
Most of the time in this situation I used to set my camera aperture to a lower f-stop ( f/13, f/16, 0r f/22) then set my shutter speed until I achieved 2 to 3 stop underexposed. And sometimes used a circular polarizer for more color saturations. you can try any filter that may fit your taste. But since we are now in Digital world you can try any f-stop until you get what you want. Try to experiment there is nothing to lose.
Hi!
ReplyDeleteI have added you to the blogroll of the following blogs:
PINOYWORLD - http://www.pinoyworld.wordpress.com
THE PINOY BLOGGER REVIEWS - http://mynewsviewsreviews.blogspot.com
INSPIRATION 101 - http://inspiration101.wordpress.com
A LEADERS JOURNAL - http://aleadersjournal.wordpress.com
TOP PICK - http://toppick.wordpress.com
SEO GURU'S TIPS - http://1001tipsonline.wordpress.com
DAILY HEROES - http://dailyheroes.wordpress.com
EARN ONLINE PINOY - http://earnonlinepinoy.wordpress.com
Seo guru, top pick and a leaders journal is currently under development.
What is sure is they will be definitely serve their purpose.
Please feel free to add up also the following blogs in your blogroll. thank you very much.
Sincerely,
THE PINOY BLOGGER
thepinoyblogger@gmail.com
As usual, thanks for the tips.
ReplyDelete